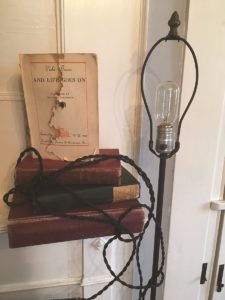
I discovered one of my favorite floor lamps in a barn, coated in dust and dirt. I took it home and cleaned it up. All it needed was a coat of black paint, a new socket, and a good shade. The transformation was simple yet complete.
I always look for old lamps at thrift stores and antique shops. I think the most I ever paid for one was $10. The best ones are often free — finds from the swap shop. Since every room needs lighting, old lamps that I’ve revived now serve a purpose and add character throughout my house.

On a trip to Italy a few years ago, I saw a lamp made out of books. It was love at first sight, until I saw the price tag. The lamp was selling for 2,000 euros (more than $2,000). For two years, I thought about that lamp. Then I came across a neglected lamp in a friend’s attic. Stowed not far from it was a plentiful supply of old books. She was glad to get rid of them. Now I had the makings of that artful Italian item.
I would not be surprised if you had most of the makings of a lamp remodel project in your own cellar or attic, though there are some practicalities to consider before starting. It’s likely your old lamp will need a new harp and shade. Those are easy to order and put on — no special skills needed. Another nice touch is an Edison light bulb. The filament shows, so the glow of the bulb is warm.
A bit more complicated is that you will need to temporarily remove the lamp socket to do this project. And the sockets on old lamps are often rusty and need to be replaced. Either way, the job is not hard to do with hardware store basics and good instructions, found on YouTube. But if you’re not handy, get advice from a professional before proceeding.
If the lamp needs to be completely rewired, handy types may forge ahead with a lamp kit ordered from a local hardware store. Consider one with a vintage-looking cloth-covered cord; they’re available in dozens of colors. If wiring is not your thing, there’s no shame and little cost in having a pro do the job.
The instructions here are focused on putting together the stacked book design. Tools and skills for this part of the project are straightforward.
Materials:
Old lamp with a narrow shaft
Old books
Electric drill or drill press
A sharp drill bit, large enough to cut a circle just slightly larger than the diameter of the lamp shaft
Steps:
1. Consider the books themselves. Create a theme by choosing, say, children’s books for a kid’s room, music or song books for a music lover, or books written in Italian for the world traveler. The possibilities are endless. Add a shabby chic element by ripping off some of the covers. Tie ribbon or twine around a few books to add color and texture to the stack you’ll be building.

2. Make sure the lamp is unplugged. Remove the socket from the lamp with a screwdriver.
3. Determine how many books you need based on the height of the lamp. For a floor lamp, you will need approximately 18 books. For a desk lamp, 8-10 books should do it. Use an electric drill or drill press to drill holes through the center of each book. Make sure the diameter of the hole is big enough to fit over the lamp rod.
4. Stack the books onto the lamp shaft. Be creative arranging the books; rotate some so they face in different directions.
5. Add a shade harp, put the socket back on the lamp (here’s where you’ll need to rewire or have a professional rewire the lamp with a new cord and plug, if necessary).
6. Finish with a unique shade and finial. I used an old shade and added my own touches with old papers and glue. Lamp shades are easy to paint and collage.
7. Add a fresh light bulb, plug in the lamp, and bask.
