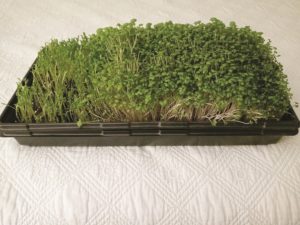
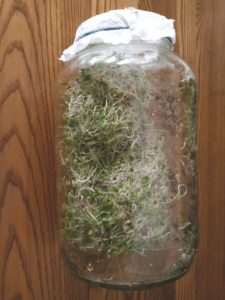
While summer vegetable gardens lie in wait under mulch and snow, some people are busy planting and harvesting miniature crops indoors. It doesn’t take much effort, say the devotees, to produce a semblance of green sustenance in a few square feet of living space.
Denya LeVine’s Wellfleet countertop has housed a tiny sprout-growing operation for the past 40 years. But this year, she told me, the longer stretches of indoor living spurred her to try a new horticultural hobby: now she’s growing microgreens, too.

Sprouts and microgreens require different propagation methods, but both kinds of nutritious stems are easy and fun to cultivate. One piece of advice Denya has for tenders of all types of tiny gardens: be sure to start off with seeds specific to sprouting, as other types might not work.
Sprouts are especially speedy. If you’re looking to add them to your salads and sandwiches, note that you’ll get from seed soak to harvest in less than a week.
Some of us are just not sprout fans. That’s okay, I promise. Because LeVine’s microgreen garden experiment proves these are easy and flavorful, too: micro-beets are as earthy as their full-grown counterparts. Pea shoots are sweet. And radishes are zippy, says LeVine.
Equipment-wise, you will need to go beyond your sprouting jar to grow microgreens. But growing them is even simpler than growing sprouts. The seeds can be bought in mixes or single varieties. There are innumerable online resources on how to begin, but don’t forget the options right nearby. LeVine swears by the setup she got at New Farm in Orleans. Their recommended array included trays, soil, lids, seeds, and grow lights — all she needed to farm three flats of sprouts at a time — for around $150.
If you are looking for something to keep your children entertained during these chilly months, consider bringing them in on this project. It might just get picky eaters to enjoy their greens, and the sense of accomplishment one feels when a seed pokes through the soil is unparalleled.
Sprouts in a Jar
For one gallon of sprouts
Seeds for sprouting
A one-gallon wide-mouth glass jar
Cheesecloth, coffee filter, or similar breathable covering
A rubber band
A mesh strainer
Soak three tablespoons of seeds in water overnight (12 to 24 hours). Strain out as much water as possible, then lay the jar on its side, so seeds form a layer on the side of the jar.
Cover the opening with cheesecloth or another breathable cover (you can use paper towel in a pinch) and secure it with a rubber band. Put the jar on your counter, out of direct sunlight.
After one day, the seeds will start to sprout! Twice a day, rinse the seeds in water, drain through a strainer, and return to the jar. After 4 or 5 days, place the jar in a sunny window for a day, which will turn your sprouts green and ready to eat.
Remove sprouts from the jar, place in a clean container, and store in the fridge for up to 7 days.
Be sure to thoroughly clean your glass jar when you’re done so you’ll be ready to start a new crop.
Microgreens at Home
Microgreen seeds
2 plastic seed trays (one with drainage, one without)
Seed starter soil or potting soil
Grow light (optional, but recommended)
Plastic lid (recommended)
Potting soil or seed starter soil will work. Both are sterile, so they don’t bring any pests or unwanted bacteria into the plants. They’re also airy, so they do not compact down when watered like denser soils would.
Pat your starter soil into the tray that has drainage holes, filling it about three-quarters of the way to the top. Moisten the soil so it holds together but is not wet.
Rest this prepared tray inside the tray without holes (these both can be put on a dish towel for an added layer of counter protection). Sprinkle seeds on the soil (they can be close together, as they don’t require much space to grow), and cover with just enough soil to obscure the seeds.

Moisten with a spray bottle.
Cover the tray and put it where it will get 16 to 18 hours of light each day. If you’re using a grow light, turn it on when you get up in the morning and off when you go to bed.
Daily, check the soil to make sure it does not dry out. The cover should maintain moisture levels but, if by poking in a finger, you find that the soil is dry, re-moisten with your spray bottle and replace the cover.
Seeds should start to sprout in 2 to 4 days. Different types of microgreens will be ready at different times — taste them or check the instructions on your seeds. For the best flavor, expect to wait until you see the first set of true leaves appear. These are the leaves that are a smaller version of the plant’s adult foliage that grow above the initial seedling leaves or “cotyledons.”
Many microgreens can be harvested just once and the soil can then be reset for another harvest, but some plants (pea shoots, for example) can continue to grow. Again, check your seed instructions, but generally you just need to harvest above the lowest set of leaves.


