The 1840s saw the introduction of the mass-produced valentine in the U.S. We can thank Esther A. Howland, known as the “mother of the valentine,” for that. But even with store-bought all the rage, handmade cards were cherished for their charm. Shells, lace, flowers, and ribbons adorned these miniature folk-art pieces given to loved ones.

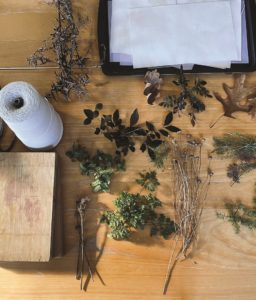
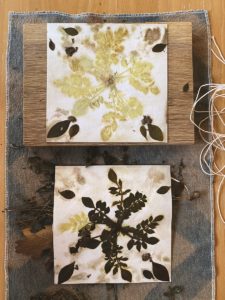
If you, too, lean toward the homemade, look to the landscape to inspire your love notes. You’ll layer flowers and leaves between sheets of paper, secure the stack between two pieces of wood, and steam over simmering water. The plants’ colors, shapes, and textures will be left behind with ethereal, unpredictable, and beautiful results.
Allow enough time for a backyard walk to gather ingredients, and a day to let the paper dry. Even on these wintry days, evergreen or dried leaves and seed heads will provide a pop of color.
Paper from a sketchpad or watercolor pad works well. Cut it, and your flat pieces of wood, to any size that will fit easily into your pot, where your stack of pressed paper will steam. I used two 7-by-9-inch pieces of cedar siding. Later you can cut the paper to make cards and tags of various sizes.

Plant-Printed Paper
Materials needed
Large pot
Two flat pieces of wood
Good, thick paper
Twine or wire
Plant material
Vegetable steamer or a large flat stone
Water
White vinegar
1. Soak the paper in water with a splash of white vinegar for about an hour — this process, called “mordanting,” will help the color set to the paper fibers. Thick paper works best. Use a flat baking tray, dish, or your kitchen sink. While paper can be dried and stored for later use after mordanting, you will begin this project with wet paper.
2. Place one piece of wood on a flat surface.
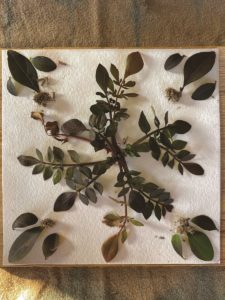
3. Add a sheet of wet, mordanted paper. Arrange dried or fresh plant material on top. Try not to be too fussy or overthink the design, as the colors will bleed through and coalesce during the steaming process.
4. Add the next sheet of paper and arrange plant material. Layer wet paper with plants until the stack is about 2 inches high, keeping in mind that everything will need to fit inside your pot.

5. Place the second piece of wood on top and secure the stack tightly with twine or wire, using caution not to disrupt your arrangements.
6. Meanwhile, fill a pot with a few inches of water. Place a vegetable steamer (or flat stone) inside the pot. Bring to a boil, lower heat to medium, then carefully place the bundle in the steamer (or on top of the stone so it is above water) and simmer for an hour with the lid on, rotating bundle halfway through.
7. Allow to cool and carefully remove bundle from pot. Open bundle when completely cooled. A longer wait may yield deeper, more saturated colors. Remove plant material carefully from paper. Rinse paper and hang to dry. Plant materials can be composted or reused for more printing.
8. Iron paper to press out any wrinkles and lay under a few heavy books to fully flatten. Your printed paper can be cut into various sizes for notes, cards, or tags.


