This is a strange time of year, when we are supposedly in more relaxed modes and keeping more relaxed schedules. But for most of us it’s a busy time, and we worry about running out of steam — forgetting that there is something we can do to restore our energy: rest.
Restorative yoga is designed to help us do just that. This approach to yoga involves supporting the body in various poses that promote deep relaxation. There you’ll find the kind of rest that allows the mind and body to heal and rejuvenate. You can benefit from these poses whether you’re an active person, tired from intense exercise, or someone who spends your days in front of screens.
For this style of yoga, you go into a pose with lots of supports to make your body comfortable. Then you give your body time in the pose. That’s what allows your nervous system to settle down and switch into the parasympathetic state. Sometimes referred to as “rest and digest,” this is part of your autonomic nervous system, which takes care of many functions that you don’t have to think about to control. Activating it helps promote healthy sleep, digestion, and physical relaxation.
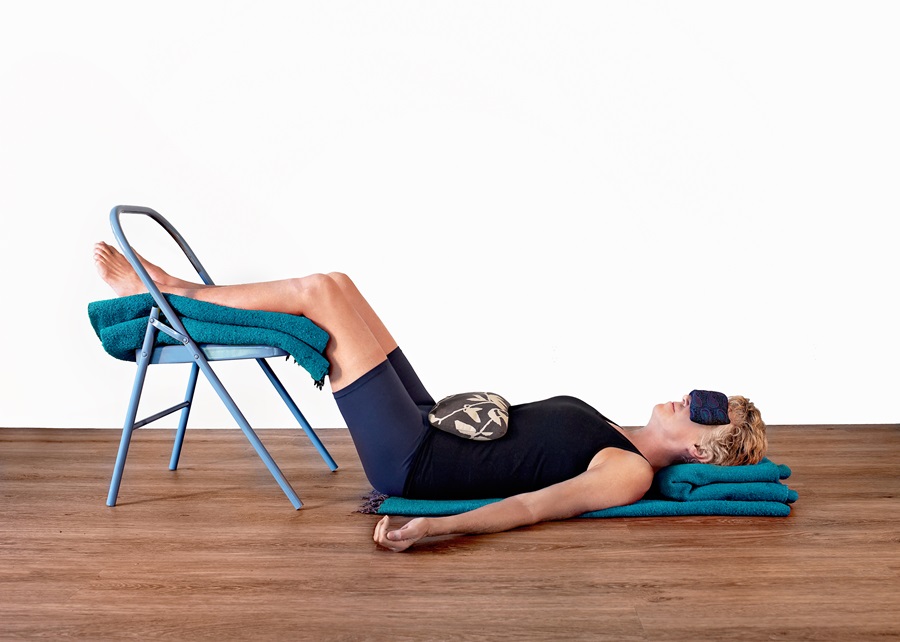
The restorative pose I will explore here is the basic relaxation pose with legs on a chair. It can be done by almost anyone, but it is not recommended if you are more than three months pregnant.
You will need a quiet room and a few props: a chair, two blankets, a towel, an eye bag (an eye mask or any soft cloth will do), and a clock or timer — the idea is to remain aware of time and not simply fall asleep in the pose.

Begin by setting up the chair in front of you and laying the blanket perpendicular to it such that it will cushion you when you lie down and put your legs up on the chair seat. Start with that: lie down on the blanket and place your lower legs on the seat. Your legs should be more or less parallel to the floor. The legs should feel supported; knees and hips are bent and should feel relaxed and comfortable. You may need to adjust the height of the chair seat to accomplish that.
Now, take your towel and roll it up just enough so you can slip it under the natural curve of your neck to allow your head and neck to feel supported. It is meant to put the neck in a neutral position, with the back of the neck long, supporting the natural curve of the neck. Tucking the towel under the back of the neck and tucking the chin slightly should feel like it eases strain in the neck and shoulders.
When you are comfortably settled, lay a folded blanket or a lightweight sandbag on your abdomen. (Sandbags are yoga props that are used to add gentle weight to support poses, but you can get much the same effect with a folded blanket.) If you’re in a cool room and would like an extra blanket for warmth, lay that over yourself now. Let your eyes relax and cover them with an eye bag or anything that blocks the light and does not chafe. I sometimes use a favorite soft T-shirt.
Covering your eyes is important: light stimulates the brain and right now you want to help the brain and mind settle down. But if you find covering your eyes very uncomfortable, do what you can to lower the light in the room where you are practicing. Sound can also be stimulating, but some people find listening to soothing music enhances their relaxation. To each her own.
Let your arms rest at your sides, far enough from your rib cage to allow them the space to relax fully. If your arms or shoulders are not comfortable extended like this, you may need to support them by placing additional towels or blankets underneath the length of the arm and hand.
The covering of your abdomen can feel odd at first as the layers of tension release. Breathe and give it time; the weight will help your abdomen soften. As the abdomen relaxes, so does the lower back.
Now swallow and soften your jaw, let the root of your tongue get heavy, and release. Soften your eyes. Let your legs roll out. Allow your back body to feel the support of the floor as if you were being held by the Earth.
As you begin to let down in the pose, you may notice your body feeling lighter. Now is a good time to add a centering breath to your practice: Take a long easy inhalation, followed by an equally long exhalation, through the nose if possible; repeat two or three times, then follow with several cycles of your regular breathing rhythm. Repeat the centering breath pattern being careful never to force your breath. If at any time you feel dizzy or uncomfortable, release your breath and just breathe naturally.
Remain in the pose for 5 to 20 minutes.
When you come out of the pose, move very slowly. First remove the blanket or sandbag and your eye covering. Bend your knees and roll to one side, resting there for several breaths. To sit up, press the floor with your elbow and use the palm of your other arm to push yourself up. Remain seated for a few breaths.
Close your eyes and notice what you have cultivated in this pose. It relaxes the muscles and organs of the abdomen as well as the lower back. Restorative poses may help to lower blood pressure and reduce fatigue. Later you can note whether it has helped you sleep better — in that way doubly refilling your energy bucket.


