When I was a child, Valentine’s Day was one of my favorite holidays. But I’m not sure I understood that the theme was primarily about people in love. I was not the type of nine-year-old who pined for a crush in the next classroom or even for a celebrity crush. No, from my perspective this pink and red heart-filled day was about making and receiving cards.
I have always loved crafts. I was making ornaments for the Christmas tree with my mom when I was only three. At five, I asked her to teach me to sew. At seven, I wanted to learn to knit. At eight, my father took me into the model shop at his office (he is an architect) and taught me how to use an X-Acto knife and piece together matboard at right angles. He and I made a whole village once out of cardboard.
Then there were Klutz kits, tissue paper flowers, bead animals, Shrinky-Dinks, and bracelet making. I especially loved it if following the directions was optional. I always wanted to make my own version instead of something that looked like the picture.
When cards were exchanged at school and I ended up with a pile of 20 assorted, brightly colored papers from my classmates, I was just as excited about the Disney-character-adorned tiny folded cards from the drugstore as I was about the handmade ones. The pop-culture-inspired cards always felt like a novelty to me. Something to collect. They made me feel included in a world that I didn’t always understand. I remember a SpongeBob SquarePants card that I particularly liked — I grew up without cable TV and never saw the show. In all likelihood, I wouldn’t have even liked it, but the picture of a bright yellow sponge with huge eyeballs standing in front of a pineapple under the sea certainly intrigued me.
One year, my collection also included a card made of a thin piece of heart-shaped plywood painted red, dipped in glitter, and pasted to a beautiful folded paper card. It was clear to me even then that a parent had made this card, but I loved it all the same. A card made of plywood? So cool!
As I got a bit older, and cards stopped being exchanged in school, Valentine’s Day started to lose its number-one spot on my holiday list. I continued to try valiantly to keep the cards coming by making cards for my friends and family. And with the advent of “Galentine’s Day” I’ve found a bit of new validation for pursuing my crafting compulsion.
The favorites in my collection seem to fall mostly into one particular category: the pop-up card. These always felt like magic to me, and they still do, even though I now know how they are made.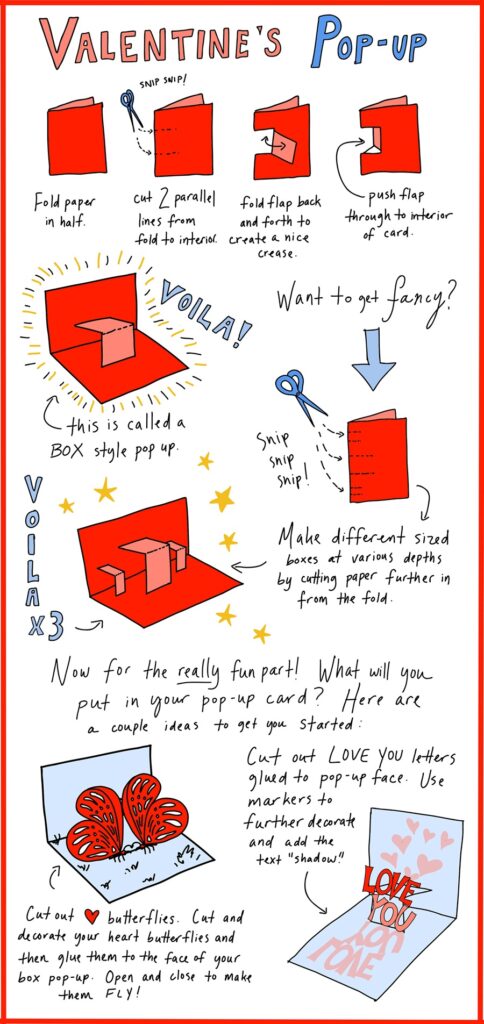
There are so many variations on the pop-up — some simple, some extremely complex with many layers that fold in different directions. I remember keeping an excellent dancing Snoopy pop-up open on my dresser for a whole year: his short beagle legs appeared to trot back and forth, and Woodstock and friends made circles around his head as you opened and closed the card. I used to have a pop-up book version of The Wonderful Wizard of Oz. I was never the type of child to cut up a book, but with that one I was sorely tempted. I wanted to see how the Emerald City came to life every time I opened the page.
This, of course, is an example of a very complex pop-up construction, but the simple ones still delight. To make your own, I recommend you follow the directions here for the basic structure, then, if you are like me, experiment and create to your heart’s desire. If, instead, you’re the kind who finds yourself staring at a blank piece of paper feeling fear, or your mind goes totally blank, the illustration offers some ideas for filling your card after you have constructed the pop-up base.
I hope this will inspire you to gather some materials and spend a winter afternoon making cards with your child, your friends, or all by yourself. Is there anyone out there who wouldn’t appreciate a handmade card? This Valentine’s Day, I encourage you to spread your love a little further than normal. We could all use a little extra.
HOW TO MAKE A POP-UP CARD
Makes a pop-up filler for a 4-by-6-inch card
Stiff paper such as construction paper or card stock in your color(s) of choice
Scissors
Liquid glue or a glue stick
A pencil
Colored pens, pencils, markers, glitter*, etc.
A ruler (optional)
*Neatniks, proceed with caution: glitter has a mind of its own.
- Cut a piece of stiff paper to make an 8-inch by 6-inch rectangle; fold it in half to make a 4-inch-by-6-inch card. (If you’re slipping this pop-up inside a ready-made card, just glue this at the edges so it stays inside the card. If you’re not using a ready-made outer card, cut two rectangles of the same size and set one aside — you can decorate it, too, then place the pop-up into it, gluing it around the edges so it stays inside the card.)
- Starting at the fold, cut two parallel lines toward the center of the card. These can be as deep as you like, but make sure they are the same length.
- You have now created a flap. Fold this flap in both directions and crease it at the folds. This breaks some of the paper fibers and creates a nice “pop.”
- Push this flap through to the center of your card. When you open your card, you will see that the flap creates a box inside — that’s your pop-up box. You can paste any design you please onto this box and it will “pop” as you open your card. Cut out your desired image or phrase and glue to the vertical facing side of your pop-up box.
- (Optional) Fancy additions for the pop-up ambitious: If one pop-up isn’t enough for you, you can create many within one card. Do this by cutting multiple sets of parallel lines as in step 2. Make each pair of lines a different depth, so that when you open your card, you have boxes of different sizes. When you paste decorations to these boxes, some will be in front of, or behind, others. Think of your pop-up as a stage set ready to be adorned.